rancher2.x安装
官方建议将 Docker 单机安装方式仅用于开发和测试环境,因为这种方式只有单节点模式,不具备高可用能力。生产环境通常更推荐使用 Helm 或 Kubernetes 方式部署。
官方文档:https://rancher.com/docs/rancher/v2.6/en/installation/other-installation-methods/single-node-docker/
中文文档:https://docs.rancher.cn/rancher2/
本文以 2.5 版本为例。2.6 在部分环境下部署 StatefulSet 时容易遇到服务选择器与 Pod 无法正确匹配的问题,因此这里优先记录相对稳定的 2.5 版本安装过程。
一、与1.x的区别
Rancher 是一个全栈式的 Kubernetes 容器管理平台,也是一个可以在任何地方都能成功运行 Kubernetes 的工具
Rancher 1.x 最初是为了支持多种容器编排引擎而构建的,其中包括自己的容器编排引擎 Cattle。但随着 Kubernetes 在市场上的兴起,Rancher 2.x 已经完全转向了 Kubernetes。 Rancher 2.x 可以部署和管理在任何地方运行的 Kubernetes 集群。
二、前置条件
服务器已经安装docker并已启动docker服务。
关闭服务器的防火墙和SELinux。
最少两台linux服务器环境,一台server,一台做etcd做集群的管理。如果只有一台,rancher服务启动的时候端口要改成别的,不要占用80和443,因为etcd可能会需要这两端口
修改配置文件(根据官方文档提示,不知道会不会影响。这个参数是网络相关的):
#修改配置
vi /etc/sysctl.conf
#增加一下配置
net.bridge.bridge-nf-call-iptables=1

#让其生效
sysctl -p /etc/sysctl.conf
三、Docker调优
https://docs.rancher.cn/docs/rancher2/best-practices/optimize/docker/_index
vi /etc/docker/daemon.json注意不要绑定固定 IP,否则容易引发网卡冲突。另外,Docker CE 24 以后移除了 override_kernel_check 配置,如果沿用旧配置文件,需要同步删除相关 storage-opts。
{
    "insecure-registries": [
        "192.168.1.21"
    ],
    "registry-mirrors": [
        "https://7bezldxe.mirror.aliyuncs.com"
    ],
    "log-driver": "json-file",
    "log-opts": {
        "max-size": "100m",
        "max-file": "3"
    },
    "max-concurrent-downloads": 10,
    "max-concurrent-uploads": 10
}
如果当前机器之前跑过旧的 Kubernetes、RKE 或 Rancher 环境,建议先清理历史环境信息。下面保留的是旧版清理脚本示例,最新版脚本建议以官方仓库为准。
使用清理脚本:https://github.com/rancher/rancher/blob/v2.6.5/cleanup/binding-clean.sh
#!/bin/bash

# Directories to cleanup
CLEANUP_DIRS=(/etc/ceph /etc/cni /etc/kubernetes /opt/cni /opt/rke /run/secrets/kubernetes.io /run/calico /run/flannel /var/lib/calico /var/lib/weave /var/lib/etcd /var/lib/cni /var/lib/kubelet/* /var/lib/rancher/rke/log /var/log/containers /var/log/pods /var/run/calico)

# Interfaces to cleanup
CLEANUP_INTERFACES=(flannel.1 cni0 tunl0 weave datapath vxlan-6784)

run() {

  CONTAINERS=$(docker ps -qa)
  if [[ -n ${CONTAINERS} ]]
    then
      cleanup-containers
    else
      techo "No containers exist, skipping container cleanup..."
  fi
  cleanup-dirs
  cleanup-interfaces
  VOLUMES=$(docker volume ls -q)
  if [[ -n ${VOLUMES} ]]
    then
      cleanup-volumes
    else
      techo "No volumes exist, skipping container volume cleanup..."
  fi
  if [[ ${CLEANUP_IMAGES} -eq 1 ]]
    then
      IMAGES=$(docker images -q)
      if [[ -n ${IMAGES} ]]
        then
          cleanup-images
        else
          techo "No images exist, skipping container image cleanup..."
      fi
  fi
  if [[ ${FLUSH_IPTABLES} -eq 1 ]]
    then
      flush-iptables
  fi
  techo "Done!"

}

cleanup-containers() {

  techo "Removing containers..."
  docker rm -f $(docker ps -qa)

}

cleanup-dirs() {

  techo "Unmounting filesystems..."
  for mount in $(mount | grep tmpfs | grep '/var/lib/kubelet' | awk '{ print $3 }')
    do
      umount $mount
  done

  techo "Removing directories..."
  for DIR in "${CLEANUP_DIRS[@]}"
    do
      techo "Removing $DIR"
      rm -rf $DIR
  done

}

cleanup-images() {

  techo "Removing images..."
  docker rmi -f $(docker images -q)

}

cleanup-interfaces() {

  techo "Removing interfaces..."
  for INTERFACE in "${CLEANUP_INTERFACES[@]}"
    do
      if $(ip link show ${INTERFACE} > /dev/null 2>&1)
        then
          techo "Removing $INTERFACE"
          ip link delete $INTERFACE
      fi
  done

}

cleanup-volumes() {

  techo "Removing volumes..."
  docker volume rm $(docker volume ls -q)

}

flush-iptables() {

  techo "Flushing iptables..."
  iptables -F -t nat
  iptables -X -t nat
  iptables -F -t mangle
  iptables -X -t mangle
  iptables -F
  iptables -X
  techo "Restarting Docker..."
  if systemctl list-units --full -all | grep -q docker.service
    then
      systemctl restart docker
    else
      /etc/init.d/docker restart
  fi

}

help() {

  echo "Rancher 2.x extended cleanup
  Usage: bash extended-cleanup-rancher2.sh [ -f -i ]
  All flags are optional
  -f | --flush-iptables     Flush all iptables rules (includes a Docker restart)
  -i | --flush-images       Cleanup all container images
  -h                        This help menu
  !! Warning, this script removes containers and all data specific to Kubernetes and Rancher
  !! Backup data as needed before running this script, and use at your own risk."

}

timestamp() {

  date "+%Y-%m-%d %H:%M:%S"

}

techo() {

  echo "$(timestamp): $*"

}

# Check if we're running as root.
if [[ $EUID -ne 0 ]]
  then
    techo "This script must be run as root"
    exit 1
fi

while test $# -gt 0
  do
    case ${1} in
      -f|--flush-iptables)
        shift
        FLUSH_IPTABLES=1
        ;;
      -i|--flush-images)
        shift
        CLEANUP_IMAGES=1
        ;;
      h)
        help && exit 0
        ;;
      *)
        help && exit 0
    esac
done

# Run the cleanup
run
四、私有镜像
参照rancher2镜像到私仓的方式下载镜像到私有仓库
五、时间同步
如果服务器时间是同步的,不需要走下面的安装,否则都按照下面方式插件
yum install ntp ntpdate -y5.1 服务端配置
涉及到的服务器必须同步时间,否则会有很多问题,这里拿rancher服务端做时间同步的服务端
编辑配置文件
vi /etc/ntp.conf修改配置
#文件自带的server xxxx注释掉
#server 0.cn.pool.ntp.org
#server 1.cn.pool.ntp.org
#server 2.cn.pool.ntp.org
#server 3.cn.pool.ntp.org
#添加以下配置
restrict 192.168.1.0 mask 255.255.255.0 nomodify notrap
restrict 0.cn.pool.ntp.org nomodify notrap noquery
restrict 1.cn.pool.ntp.org nomodify notrap noquery
restrict 2.cn.pool.ntp.org nomodify notrap noquery
restrict 3.cn.pool.ntp.org nomodify notrap noquery
server 127.0.0.1 # local clock
fudge 127.0.0.1 stratum 10
重启服务:systemctl restart ntpd && systemctl enable ntpd
5.2 客户端配置
编辑配置文件
vi /etc/ntp.conf修改配置
#添加以下内容,注意ip地址为server的地址
restrict 192.168.1.20 nomodify notrap noquery
server 192.168.1.20
server 127.0.0.1
# local clock
fudge 127.0.0.1 stratum 10
重启服务:systemctl restart ntpd && systemctl enable ntpd
六、docker安装
#拉取镜像
docker pull rancher/rancher:v2.5.12
#相关卷查找
docker inspect rancher/ancher:v2.5.12
启动容器
docker run -d --name=rancher \
-v /etc/timezone:/etc/timezone -v /etc/localtime:/etc/localtime \
--privileged --restart=unless-stopped \
-p 80:80 -p 443:443 rancher/rancher:v2.5.12
使用自签的ca证书启动
docker run -d --name=rancher \
-v /etc/timezone:/etc/timezone -v /etc/localtime:/etc/localtime \
-v /software/ssl/cakey.pem:/etc/ssl/certs/ca-additional.pem \
-v /software/ssl/cakey.pem:/etc/rancher/ssl/ca-additional.pem \
-v /software/ssl/tls.crt:/etc/rancher/ssl/cert.pem \
-v /software/ssl/tls.key:/etc/rancher/ssl/key.pem \
-v /software/ssl/cacerts.pem:/etc/rancher/ssl/cacerts.pem \
-v /software/rancher:/var/lib/rancher \
-e CATTLE_SYSTEM_CATALOG=bundled \
--privileged --restart=unless-stopped \
-p 80:80 -p 443:443 rancher/rancher:v2.5.12
注意
如果是使用私仓(harbor)安装rancher,则需要再全局配置里设置system-default-registry仓库地址,这里会出现一个问题,如果私有仓库的是使用的自前面证书, 非域名证书,如harbor仓库地址为:192.168.1.21。如果不挂载的话可能会报以下错误:
/v2/rancher/shell/manifests/v0.1.19\\\": x509: certificate signed by unknown authority\", failed to \"StartContainer\将harbor的证书放到/software/k3s(可自定义)路径下,需要在下增加以下配置文件registries.yaml,内容如下:
mirrors:
  docker.io:
    endpoint:
      - "https://192.168.1.21"
configs:
  "192.168.1.21":
    tls:
      cert_file: /etc/rancher/k3s/http.pem  # 注册表中使用的证书文件的路径
      key_file: /etc/rancher/k3s/http.key # 注册表中使用的密钥文件的路径
      ca_file: /etc/rancher/k3s/ca.pem   # 注册表中使用的 ca 文件的路径
启动命令增加一个映射卷为:
-v /software/k3s:/etc/rancher/k3s \参考地址如下:
https://vineetcic.medium.com/air-gap-installation-of-single-node-rancher-13f705e16429
https://docs.k3s.io/installation/private-registry
配置本地
2.6的版本这里有个参数介绍:
CATTLE_BOOTSTRAP_PASSWORD这个是rancher密码的参数,可以用也可以不使用。如果使用了这个引导密码,则后面不需要重置密码,没有设置进去会有提示。在容器中获取密码。
#rancher为你的容器id
docker logs  rancher  2>&1 | grep "Bootstrap Password:"
这里需要等待几分钟加载
七、进入管理界面
https://本地ip:port,如果没有设置密码,需要设置admin的密码,账号是admin
2.5版本在右下角修改语言,2.6在左边的菜单栏右下角修改
找到集群管理->添加集群 ->自定义 设置集群的名称,然后下一步。
注意:下一步选择集群管理,并且选择etcd
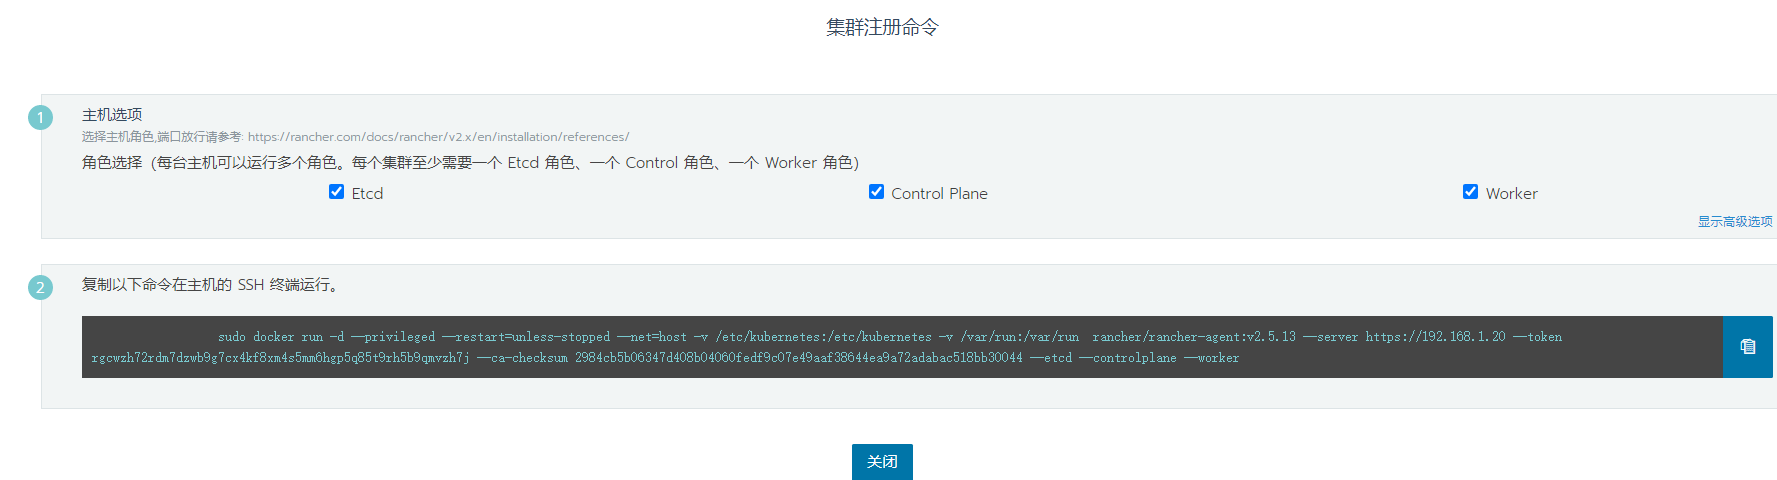
然后等待构建,这里构建可能需要10-30分钟,期间可能还会报错,遇到问题一个根据官网文档和github提示解决吧
这里可以通过docker容器日志查看情况,因为会下载一些别的镜像,可能由于网络原因会比较慢等原因。
构建节点调优
https://docs.rancher.cn/docs/rancher2/best-practices/optimize/os/_index
问题记录稳定
https://docs.rancher.cn/docs/rancher2.5/faq/upgrade/_index/
八、配置NFS
这里是基于nfs-server已经存在的情况,如果未存在需要自行安装nfs-server,如果需要配置nfs服务,加入k8s的主机,不管是etc还是非etc的主机,都需要安装nfs-utils, 命令如下:
yum install -y nfs-utils九、服务访问
容器之间通过集群ip如何进行通信,官方文档介绍地址:http://rancher2.docs.rancher.cn/docs/rancher2.5/k8s-in-rancher/service-discovery/_index
于创建的每个工作负载,都会创建一个相应的服务发现。此服务发现使用以下命名约定为工作负载的容器启用 DNS 解析: <workload>.<namespace>.svc.cluster.local , 即:服务名称.命名空间.svc.cluster.local
.svc.cluster.local是默认生成的,也可以通过自定义的dns去解析
十、配置helm应用商店
以2.6为例,需要在仓库地址搜索所需要的chart包:https://artifacthub.io/packages/search?kind=0&sort=relevance&page=1,如nfs-client
helm的阿里云仓库地址:https://kubernetes.oss-cn-hangzhou.aliyuncs.com/charts
helm的官方仓库(国外不推荐)地址:https://hub.kubeapps.com/charts/incubator
helm的官方仓库地址:https://charts.kubesphere.io/main